Monday, March 31, 2014

Monday's Die Cutting Machines

Good Monday morning to all, and here it is the last day of March.  Where or where is the month gone to?  Before I share my two projects using my Silhouette Cameo to cut out the items, my TIP is:  if a card that you had created is blah, bling it some more....

I chose two of my past projects that I created using the Silhouette Cameo, and I believe, in this case SCAL software to create the baby dress.  I'm not sure where the cupcake pattern came from so I'm not able to give credit where it's due, my apologizes for that.

First photo is of the baby dress I created and than added more bling to it to update the card.  I added baby pearls (SU Pearls) to both sleeves, and where the holes are at hem of the dress I took my Wink by Stella pen (Purple) and colored inside the holes.


Supplies used:
  • My own pattern file for the Baby dress card.
  • Ribbon from stash
  • the small pearls in sleeves; and two down the front from Stampin! Up
  • Wink by Stella glitter pen.
Here is the 2nd card I created using my Silhouette Cameo die machine, and a cut file I am not sure where I obtained.  The card was actually created for my great-grandson, but never got sent...I, instead went up to Indiana for his 2nd birthday party.


Supplies used:
  • Silhouette Cameo die cutting machine
  • Number 2 from SCAL font list
  • beads from my own stash
  • blue brad in center of flowers
Thank you for stopping by visit with us on Monday Die Cutting Machines Day, and happy crafting to all of you.


Easter Card in a Box Card

Good morning, Carolyn here with a Card in a Box for the Easter Card challenge at Creative Cutting Challenge.  The Card in a Box had been the craze on Facebook for the past couple weeks or so; and I thought, hmmm I shall give this a try.....  But first here is a video I found on youtube;


Here is a template for you to use as well that I downloaded from a Facebook group:


I believe this is the instructions for the bigger size but I am including the zip file for 8.5x11 size that will make a standard size card, once folded, to fit in a standard envelope, one for 5.5x4.25 cards.
 
Cardstock sizes
Piece 1 - 6" x 11" and score on 11" side at 6" and 7"
Piece 2 - 6" x 51/2" and score on 51/2" side at 31/2" and 41/2"
Piece 3 - back reinforcement - 6" x 5"
Pieces 4 & 5 - 6" x 7" and score on 7" side at 5" and 6"
Pieces 6 & 7 - 6" x 61/4" and score on 61/4" side at 43/4" and 51/4"
Piece 8 - 6" x 91/2" and score on 91/2" side at 6" and 61/2"

If you would like the box to measure 3/4" depth or 1/2" just alter the scoring apropriately ... the card sizes can stay the same (your flaps will just be a little bigger - but these can also be adjusted easily, if you want to, once you've seen how the box goes together).

****
You also will find several Card in a Box cutfiles on the Silhouette America Online to select from.  I basically used the box cutfile template and added the Easter files from Creative Pointe, the Easter Egg Set and Easter Bunny Set for decorating.

Happy Easter sentiment from SilhouetteAmerica Online store; and the butterfly that is on right side on a floral wire from a Paper Garden Projects kit, Nurture.

Now here is my project that I am sharing with you.  It was quite a project for me, and I wonder if I will do this again!


Thank you for stopping by to visit with me; and happy crafting to you all.  Head on over to Creative Cutting Challenge and play along with us in the Easter Challenge.

Also, for your personal use only, here is a cutfile for Card in a Box which includes studio and a svg file.

Sunday, March 30, 2014

Challenge #16 - Anything Goes Mini-Challenge

Anything Goes Mini-Challenge

Here is my inspirational piece - a 4.25 x 8.50 note card that I printed the Baby Cherry Blossom directly to the card base along with a sentiment from the SilhouetteAmerica Online store .

 
Supplies used:
  • Dark Pink glitter pen from Wink of Stella - tracing the sentiment
  • Dark Pink glitter pen from Wink of Stella - drawing in the embossed lines
  • Crayola water coloring markers for coloring the Cherry Blossoms and leaves/stem
  • A pink gemstone for the dot of the 'I'.
Thank you for stopping by to visit with me today, apologize for the lateness of the blog.  Completely slipped my mind.  Head on over to Scrapbook Blessing Club for more instructions and inspiration by the DT members and join with us in this mini-challenge. 

Saturday, March 29, 2014

Spring Flowers


Supplies used:
Placed one of pieces of the Flower Pot Card on my virtual mat in Silhouette Design Edition, and placed the flowers and Mouse under the flower in the pot.  Printed and than using my Crayola water color markers colored the image.  Stamped Hello on one corner of card, and placed two beads in the mouse's eyes; and one gemstone in the corner.  The butterflies come as a set of three to stamp one on top of each other.  Once I got the colors to my liking, I punched out with the corresponding punch; and have nice note card to use.

***

 Flower Garden Paper Piecing Pattern - jpg

Supplies used:
  • Roses from Flower Garden Paper Piecing Pattern Set
  • Butterfly not sure where that came from!
  • Tree trunk and grass is a cut file from the SilhouetteAmerica Online Store
  • Hello stamp
  • Cardstock 4.25x8.50
I placed pieces where I hope they would be appealing on my Silhouette Design Edition virtual mat, and than print and cut the card.  The Roses were images to color in with my Crayola water coloring markers.  The Butterfly that's printed in the left hand corner from a file I don't remember where I gotten it.  Stamped Hello and placed three green gemstones to create a nice note card for a set of note cards to be boxed .

Thank you for stopping by to visit with us at Sunsational Stamps; and please visit the stores at Scrappin with Lisa ; and at Sunsational Stamps.  Hugs to all, and happy crafting.

Tuesday, March 25, 2014

Let Your Faith....

Say it With Words


Supplies used:
Thank you for stopping by to visit with me; and hugs to all xoxo

No 1 Measures Up 2 U


Here are the measurements:
In centimeters:
Card 15 x 15 double folded
10 x 7
12x6,5
8,5 x 9,5
8,5 x 8

Approx in inches:
6x6
4x2¾
4¾x2½
3½x3¾
3¼x3½

Mat your card base with 1 layer cardstock and 1 layer design paper.
Mat all other piece with desiger paper.

Print your image in approx 11 cm (4¼ inch) height
colour your image, cut it out, place it on a uni coloured paper and cut it out again but with a small edge

Have your embellies ready too

The above is copied from Scrapper's Delights Fan Page .  Thank you for stopping by to visit with me; and happy crafting to you all.

Sunday, March 23, 2014

My 2 Sunshines 1-page Layout

Good morning on a Sunday morning.  Lately I have been playing around with the newest Abode Photoshop Elements 12 and created this digital layout with my two great grandchildren which I am sharing with you.


 I love flowers and butterflies so used them in my design of a 12x12 layout with a border along the bottom of the page.  Flowers around the frames and butterflies up the center.  

I printed out onto photographic paper and ready to add some embellishments to.  The kit comes with cut out files for the butterfly and flowers, so plan to cut and place them over one butterfly and couple of the flowers, and my page will be finished.

Thank you for stopping by to visit with me, and happy crafting.

Saturday, March 22, 2014

Need a Hug card

I would like to take a few minutes and share a card I created with you all....

Need a Hug?

Supplies used:
  • Doily and Scalloped-edge card base from SilhouetteAmerica Online Store
  • gemstones
  • pink gemstones
  • chevron design paper from personal stash - 6x6 paper pad
  • Bow Maker to create the ribbon bow
I cut the Teddy Bear and title with my Silhouette Cameo, using Studio DE software.  I colored in the title and Teddy Bear with my watercolor pencils.

Thank you for stopping by and Happy crafting.


Tuesday, March 18, 2014

Lisa the Doll

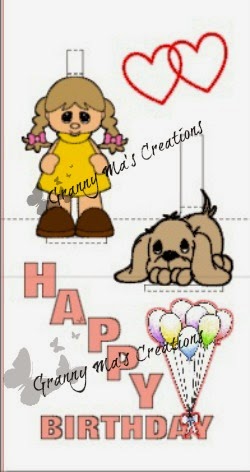
I have finished creating a birthday card using Make the Cut, Silhouette Studio, Scrap Factory by Scrappy Dew, and Make the Cut Pop-up Card Studio and sharing with you.


This is the Print N Cut  using Silhouette Studio Design Edition (Sorry folks, I have a mental block when it comes to print 'n cut in Make the Cut and/or SCAL3...for some reason it is not clicking with me!)


Image to the right is from Make the Cut Pop-up Card Studio.  Lisa, was created using Scrap Factory; and than copied and pasted to Make the Cut.  There I placed the image together and duplicated the  completed image and blacked out so I would copy and paste into the Pop-Up Card Studio.  The puppy dog is from the MTC Library (don't know who created as no name was given)

Once I completed he Pop-up base, I saved as a svg file; and than imported into Make the Cut, placed the finished image onto the base card and saved as a svg file.  Than I merged into my Silhouette Studio Design Edition where I placed the balloons, hearts and sentiment in different spots.  Now it's ready for print 'n cut when I need a birthday card.

I enjoy watching Susan BlueRobot's instructional videos on Vimeo and learning so much.  Don't know what I will do with it, but I enjoy learning, and keeping my mind active.

Thank you for stopping by to visit with me today, and hugs to all xoxo.

Monday, March 17, 2014

Challenge #30 Anything Goes


Happy St Patrick's Day to one and all.  Our challenge at Creative Cutting Challenge is Anything Goes and I created a 1-page layout for my granddaughter's scrapbook, showing Alexis and Kassidy planting flowers in their 'flower garden' two years ... and in a few weeks they will be doing the same when they come to visit Grandma (moving back to the States from Korea).

Supplies used:
Please stop by Creative Cutting Challenge and play along with us in this challenge.  See you all there; and thank for stopping by to visit with me today. Hugs to all xoxo.

Sunday, March 16, 2014

Challenge #15 - Say What?

For this challenge we used this tutorial to create our card ....

  showing us how to a Bordered Sentiment.

But before I share with you my card I created, here is important info:

The prize for this challenge comes from:  Stamp and Create

Stamp and Create is an online store based in the US with shipping worldwide. We offer free shipping on orders over $55 within the US. We carry a wide variety of stamp companies including: MagnoliaSaturated CanaryWild Rose StudioHigh Hopes Rubber StampsMake it CraftyWags 'n Whiskers and many more. Plus we also carry paper packsribbon, and embellishments. We currently have many Christmas designs on Clearance at a great price.

Here is my take on it:


Supplies used:
I placed the flowers and sentiment on the virtual mat of my Silhouette Studio Design Edition; and than print and cut it.  And with my Big Shot I embossed the top part of the mat and before adhering to the 2nd mat, I glued in the green ribbon.

I used my Derwent Watercoluor pencils and colored the floral image.  Placed three green beads on right hand lower corner. Using my corner punch, I punched opposite corners of each mat, plus the card base.  (This will be going in to a set of 6 cards to be pkg'ed in handmade box).

Head on over to Scrapbook Blessing Club  and play along with us in Challenge #15.

Thank you for stopping by, and hugs to all...xoxo.

Saturday, March 15, 2014

Let's Have Some Fun Challenge

For a project, I made a Hello Card using the file from...check here for the free file to create and share in a Linky Party at Sunsational Stamps


Supplies used:
  • Cardstock, ribbon and baker twine by Stampin! Up 
  • Swiss dot embossing folder
  • Button from personal stash
  • Hello rubber stamp
  • green gemstones
  • Silhouette Cameo and Designer Edition used for creating the circle mat
  • Sizzix Big Shot used for embossing.
  • This is the free digital stamp that is provided on the DT BLOG at http://sunsationalstamps.blogspot.com/ and you use the little link at the bottom of our blog at http://sunsationalstamps.blogspot.com so we can view your project. Hope you will all join in the fun .

Thanks for stopping by hugs to all xoxo

Friday, March 14, 2014

Let Your Faith.....

Say it With Words


Supplies used:
Thank you for stopping by to visit with me; and hugs to all xoxo

Monday, March 10, 2014

Another Pop Up Card

Good morning, all.  I am here to share another Pop Up Card Studio project that I just finished ...


This is a St Patrick's Day card using a pot o' gold svg file from Cre8ive Cutz; and the sentiment is one I created using the text option in the software.  I have not test cut this yet...just wanted to share with you.

Thank you for stopping by, and hugs to all xoxo.

Sunday, March 09, 2014

Birthday pop-up card I've been working on...


This is what I have been working on for a little while now, and finally completed my version of it today and very happy with the results.  I haven't test cut it yet, just want to share with you all my accomplishment.  I was close to uninstalling the software by Make the Cut - Pop Up Card Studio as I am having problems with a gazebo but will go back to working on it.

Now, I admit, the picture is not the greatest  because of the angle, but the top word is 'Birthday' ... lol.  But I am learning this software, and this is from a tutorial at Susan Bluerobot.com and I followed the video tutorial as best as I can.  Hopefully, I can graduate from beginner to more of  a immediate and create my own cards.  I've done a couple designs, but they're for a personal envelope mini-envelope that I hope to cut and place in the mini-albums for the granddaughter's.  More will come later on the mini-albums.

Thank you for stopping by, and blessings to all.  xoxo

Saturday, March 08, 2014

Love Letters 2-page Layout

Hi, Carolyn to share with you a 2-page layout using the images "Love Letters" and my two adorable great-grandchildren, Carson (3) and Isabella (1) for his book of memories....


Page One

 
Page Two

Supplies used:
  • Scrapbook backing paper from Wal-mart in their craft dept (no longer available)
  • The doily mats cut using doily files from the SilhouetteAmerica Online Store
  •  Bears and Lettering Love Letters
  • Coloring done with Spectrum Noir and Prismacolor Art Markers
  • Matting cut out using my Cameo
  • Gemstones and adhesvie
Thank you for stopping by to visit with me today, and hugs to all...xoxo


Friday, March 07, 2014

Challenge #87 - Using Green for St Patrick's Day


using this sketch


Supplies used:
  • Pot of Gold image
  • Prismacolor Art Markers
  • Cardstock and design paper from stash
  • scalloped edge punch
  • Green gemstones to highlight card
  • Green shamrocks cut out using my Silhouette Cameo
  • adhesive
  • sentiment found on the SilhouetteAmerica Online Store
Actually this was my 2nd attempt with creating this card.  The first design was a sunburst background but cutting the second time did not go well, so I found this sketch on PaperPlayful.com - a listing of challenges/winners and decided to use it.  I will be using sketches in my card/scrapbook page layouts as it gives me a form of organization - to have a sketch to work from/with.

Thank you for stopping by to visit with me today, and head on over to Pattie's Creations Designs Challenge and play along with us in Challenge #87.

****
Challenges entering:

Monday, March 03, 2014

Monday, Die Cut Machines

Hello my scrapping/card making friends, Carolyn here with a card project I done on my Sizzix Big Shot and a new die that I just recently purchased for Monday's Die Cut Machines.  Tip will follow below.


This is a Flip-card using a Ornate label die, front and with the card laying flat out so you see the inside of the card. 

Tools/supplies used:


  • Silhouette Cameo for cutting the Ornate Label, and print and cut the butterfly.
  • Scalloped edge hand punch for the edge of card plus the mat
  • Oval punch for matting
  • Stamps from retired stamps set by Stampin! Up
  • White pearl beads that I placed on butterfly embellishments from Stampin Up
Thank you for stopping by to visit with me today; and hugs to all xoxo....


Sunday, March 02, 2014

Challenge #14 - Punches Galore

Challenge #14 for next 2 weeks is sponsored by:


  One lucky winner will receive a 4 digital stamps of their choice..... so come on over to Scrapbook Blessing Club and join in this fun challenge.

****

Challenge #14 at Scrapbook Blessing Club is Punches Galore - using punches on our creations and now for my card  where I used two punches....


Supplies used:
  • 5.25x5.25 matting for card 
  • Fancy Oval (I really can't remember name of die but it's by Sizzix)
  • Eyelet hand punch
  • curve tag from my Silhouette Studio Library
  • thinking of you stamp from Teeny Tiny Words by Stampin Up
  • Water pitcher with flowers by Meljen's Designs
  • Big Shot and Fancy Oval die
  • Small silver brads from Stampin Up
  • Cardstock and design paper from personal stash
This was not my original plan for this card, but as always, it changes as I am working with the creation.  I  created the oval frame 2 times, and using the 2nd piece and trimmed along the dotted lines which matched the inside of the Fancy Oval frame.  I printed the Meljen's Design image "Pitcher with flowers) and than using my oval framelits, I created another oval mat.

Using my Prismacolor watercolor pencils I colored the image.  Than I placed all pieces onto a card base where I punched the back of card base with my eyelet hand punch, and also used the same punch for the matted pieces along the left side of card.  (The sketch is a partial sketch I used from a challenge found on Facebook Srapper's Delights group page).

Thank you for stopping by to visit with me today, and as always, hugs to all xoxo.

Challenges I have entered in:

Saturday, March 01, 2014

Love Letters

Love Letters

Supplies used:
  • Sunburst cut file from SilhouetteAmerica Online Store
  • Teddy Bear with Letters from Sunsational Stamps
  • Brads, gemstones, button, and baker twine
  • Markers used: Stampin! Up and Copic for the letters
  • paper used for Sunburst from "My Library" in Silhouette Studio
  • Measurements:  5.50x4.25 inches
I cut the Teddy Bear with Letters using my Silhouette Cameo, tracing first so I cut out the background for placement of the Bear, onto poster board.  Cut the sunburst background and placed over greenish-blue-ish cardstock.  The little band  I color picked the color from the sunburst and than printed and cut out.  

The words, Love Letters I cut out and placed on the strip and than colored in.  Placed gemstones in lower left and upper right corner; and a green button with baker twine in upper left corner.

Thank you for stopping by to visit with me today, and hugs to all xoxo.