Showing posts with label Creative Cutting Challenges. Show all posts

Monday, May 04, 2015

Challenge #53 - Mother's Day


Build A Bouquet - Click Image to Close 

and here is my card...


I created this Mother's Day card using both the Cricut Explore and Silhouette Cameo.  The  Sizzix die cut Top Note was used for front and the one inside was found on the Silhouette Design Store library.  Design paper used from the April's Card Kit thru Scrapbook Blessings Club;  card stock and gemstones from my stash; and 'Mother's Day sentiment' on front from Stampin! Up stamp set, Teeny Tiny Words.  Inside sentiment printed using the Silhouette Cameo black pen.

Thank you for stopping by to visit with me today, and hope you all have a full and happy day of crafting.  Blessings to you all.

Monday, April 20, 2015

Challenge #52 - Spring Theme


Spring has sprung and brings the golfers out to play.  Son-in-law has birthday this month, and he occasionally goes to play golf so created a 'bendy-card' for him.  Here is the file that was used to create this card;


I used the golf cart, golf bag and where you swing the ball to from this file; and here is my card...


I purchased the Silhouette Studio cut file for the bendy card envelope set sloped design by Samantha Walker. And it wasn't too bad to cut out and design.  All cardstock from my personal stash.  The golf bag is actually print and cut using my Silhouette Studio DE and the rest cut out with my Cameo.  I did create a button/flair with my son-in-law's age and placed in the corner.

The sentiment 'happy birthday' was stamped using my newest tool. MISTI - a stamp alignment tool by My Sweet Petunia - a life saver for me.


DSC_0484 

and if the ink comes out blotchy or light, without moving the card or stamp you can re-stamp until you are satisfied.  I love this little tool and will be using it more.  I am planning to convert my wood-mounted stamps down to the cushioned stamp and placing on EZ Mount foam and than presto, I have acrylic type stamp to use.  Hopefully less storage as well.

Thank you for stopping by and visiting with me today, and head on over to Creative Cutting Challenges and play along with us in the Spring Theme Challenge.  Happy crafting to all.

Monday, March 23, 2015

Challenge # 50 Easter


The Bunny Face and Hoppy Easter Sentiment from The Creative Pointe.
The 'pink' duck from It's Spring Time scrapbook layout kit ... this color was unintentional - my color ink cartridge is low on color.
The design paper from stash of paper.
Ribbon (Old Olive I believe) from Stampin! Up 

I also included the above card in the Challenge over at Scrapbook Blessings Club  for the month of April, beginning April 5, 2015.  

Thank you for stopping by to visit with me, and happy crafting to all.

Monday, March 09, 2015

Challenge #49 - St Patrick's Day

Hi, I am here to share my 2 cards I made for Challenge #49 St Patrick's Day over at Creative Cutting Challenges

 
File used:  St Patrick's Day Set

File used: Shamrock Cards
(I used the Shamrock Card base in both sets of cards)
Bear Leprechaun and shamrocks from Creative Kuts
I believe the "Happy St. Patrick's Day" sentiment from the Cricut Design Space online store.

Thank you for spending a few minutes visiting with me today, and head on over to Creative Cutting Challenges and check out the DT designs; plus join us in the challenge fun.  Have a happy crafting day.

Monday, February 23, 2015

Challenge # 48 - Baby


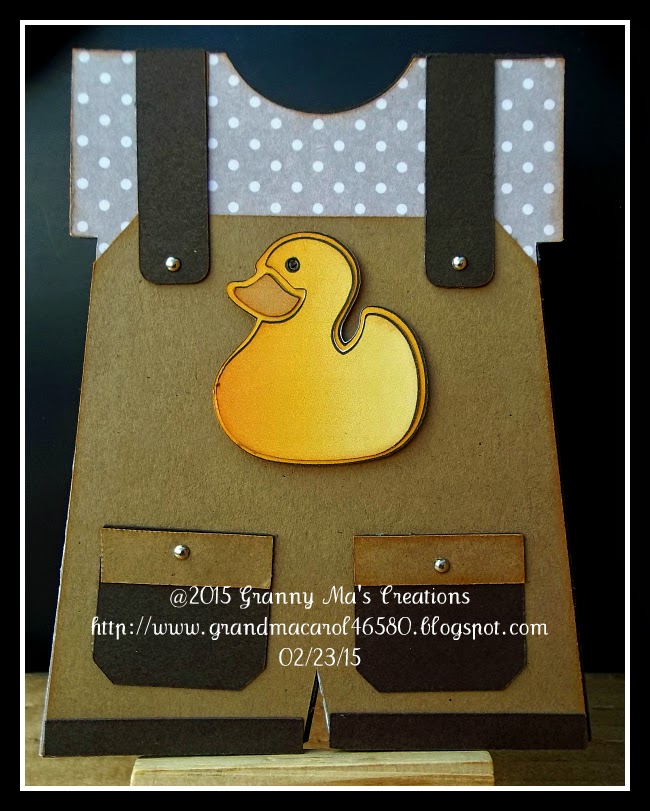
Challenge #48 - Baby here at Creative Cutting Challenges for the next two weeks, where we have created anything with a Baby Theme.  I had planned to create a baby mini-album but decided it was a huge project to do within 2 weeks, so with a niece expecting their first little boy I created the overalls in brown, with a duckie on the front.  The top piece of the duckie I cut out of ombre yellow card stock.  I inserted small silve brads in the overall straps and on the pockets to represent buttons.  The pattern did not have cuffs but I included by taking the pocket cuffs and made them longer and placed on lower edge of legs.

The first card is a Girl's dress card.  With this I copied the dress, cut along the waist and cut out a skirt for the dress, with a waistband.  Two buttons down the front under the bow with a pacifier (binkie) attached as if it was pinned under the collar.  Placed two beads on the waistband/belt area; and the word 'Baby" was cut out for the mini-album and didn't feel it matched the front cover, and decided it would work on this dress.  There is a oneies shirt under the dress that a sentiment will be stamped on (this is for my granddaughter as she is expecting a daughter the 4th of July, 2015)

The middle card is a basic card.  The matting is scrapbook digi paper from a scrapbook kit I downloaded and thought this would be cool with a baby bottle layered over the center.  Word "Baby" is wordart, I believe, from Pixel Scrapper Digital Scrapbooking that I printed and than cut and using foam tape placed under the bottle.

Baby Bottle, Duckie and Pacifier can be found at The Creative Pointe section of Cut and Create Store.  Please visit us at Creative Cutting Challenges and join us in the challenges; and take a look see at the design team projects.

Thank you for visiting with me; and have a happy crafting day.

Monday, November 03, 2014

Creative Cutting Challenge - Thanksgiving Card(s)

I created two Thanksgiving cards, one from a year or two ago that I would call 'throwback'; and I created a newer card using same file, but a pop-out card base (this card base does go by different names, but on SilhouetteAmerica online store they call it 2a-pop-out card!)


The first card in the photo I created a basic card and adhered the Pilgrim couple from Thanksgiving Set One by The Creative Pointe with leaves cut out from unknown cut file.
Than, to update the project, I found the a-2 pop-out card base on SilhouetteAmerica online store and cut it out with the Silhouette Cameo, after printing out my Thanksgiving papers on water-color paper stock.  The turkeys was cut out several times so I  can create a chipboard sticker and placed just right next to Thanks.

Thank you for visiting with me today, and hope all have a day of happy crafting.

Monday, October 20, 2014

School House Mini-album

Our challenge theme is Anything Goes and I decided to use the free file from The Creative Pointe that can be found her


School House

For the Anything Goes challenge for October 20th, I used the School House free cutfile found here and created a School-House mini-album.  I cut the school house out on poster board for front and back cover and a couple inside pages to strengthen the album.

On the front cover I placed photos of granddaughter's first day of school for 2014-15 in ruler frames, and placed where the windows would be in the file.  Apple with First of Day school sentiment and a notebook, and yellow ruller as border for embellishments
.

Next two photos show what the pages will hopefully look like when I complete them...


I will be adding photos hopefully on each page as the 2nd one shows here.  Located a volleyball  and net clipart with a google search, print and cut with the Silhouette Cameo; and the journal card downloaded from Katie Pertiet where she is offering 50 Journal cards free. 
Here is the back cover:

The mini-album will be bound with a ring on the corner of the school house.  Paper from a personal stash of paper pads I have.
Thank you for stopping by to visit with me; and head on over to Creative Cutting Challenges for more inspiration by the Design Team; and join us in the Anything Goes Challenge

Monday, March 17, 2014

Challenge #30 Anything Goes


Happy St Patrick's Day to one and all.  Our challenge at Creative Cutting Challenge is Anything Goes and I created a 1-page layout for my granddaughter's scrapbook, showing Alexis and Kassidy planting flowers in their 'flower garden' two years ... and in a few weeks they will be doing the same when they come to visit Grandma (moving back to the States from Korea).

Supplies used:
Please stop by Creative Cutting Challenge and play along with us in this challenge.  See you all there; and thank for stopping by to visit with me today. Hugs to all xoxo.

Monday, February 03, 2014

Challenge #26 - Love

Front with the 'belly band' closure
Open to inside of card and belly band.

Our next challenge over at Creative Cutting Challenges is Love - Anything to do with it. V-Day, Weddings, etc.  I chose Weddings and created a Gate-fold Easel Card.

Supplies used:
  • Design paper printed from Internet search of Wedding papers.
  • Gray matting is wrapping paper I trimmed to size and applied to freezer paper.
  • Wedding cake cut file from Wedding Set
  • Bride and Groom Silhouette
  • Flowers from sewing dept at Wal-mart
Here is the video on how to create this card with measurements, etc. which I found on Youtube.


Thank you for stopping by to visit with me today, and hope you have a blessed day.

Monday, January 20, 2014

Valentine's Day Challenge

Good morning to you all from Sweet Home Alabama... I am here sharing my Valentine Card for the DT challenge over at Creative Cutting Challenges.


Front of Popup Card

 
Inside of Popup Card

Supplies used for card:
  •   Valentine's Hearts using the Double Heart for front of card
  • Scalloped Heart from the Heart Easel Card by Birds Cards
  • The card pop out heart by Samantha Walk from SilhouetteAmerica Online
  • The tag from a stash I have
  • Red glitter by Martha Stewart
  • small hearts from a heart punch
  • design paper I print and cut using my Silhouette Studio Design Edition.
I purchased the card pop out heart recently, and when the Valentine's Day challenge came up, I thought this would be a great card to create using Cindy's Valentine's Hearts - the Double Heart.  I used the small heart pieces and glued red glitter by Martha Stewart to two hearts, to give some 'pop; to the front .  The scrolled tag located in my Silhouette Studio library, placing the sentiment on foam tape to front of card.

The inside I used design paper I created from a Internet search of valentine wallpaper and printed and added to each end of the inside.  The tag is from my stash that I don't remember when or where I purchased it.

Thank you for stopping by to visit with me today, and head on over to Creative Cutting Challenges for more DT inspiration.  Hugs to all...

Monday, November 18, 2013

Challenge #23 - Christmas - not a Card

For this challenge I decided to create a decorative box that can be set on a Christmas table, or possibly hung on a Christmas tree.  I have a very limited supply of Christmas design paper, and found this tutorial on how to use freezer paper - ironing gift wrapping paper, napkins, just about anything and making your own designer paper.


Once I decided on my wrapping paper that would be used, I tried the freezer paper technique and it worked.  I now can make my own designer paper for my projects.  

I cut the pieces out after selecting paper for material type under the cutting options in SCAL3 (the scissors). The background design paper is printed out using my new high quality digital paper which I love, love, love.  All paper was applied to the box .


After cutting out 3 sets of the Poinsettia, I placed 2 sets along the edge of the box,


The third set of Poinsettias on the corner of the inside edge.  I placed yellow flat buttons in the center of each set.

The sentiment "Merry Christmas" was a free file from Silhouette Online Storewhich I print and cut and applied to a  background shadow of red and applied to the front of box.


And that's my Christmas - Not a Card for this challenge over at Creative Cutting Challenge.  Please stop on by and join us in this challenge, would love to see what you create for Christmas - Not a Card.  Thank you for stopping by to visit with me, and hugs to all xoxo.

 
Carolyn

Monday, November 04, 2013

Challenge # 22 Thanksgiving

Autumn Mini-Album

Challenge #22 is Thanksgiving and I chose The Creative Pointe's file Fall Set, a file with 4 sets of  individual files to create. 

 
Cover using the leaves and basket.

 
Page 2 where I created a welded two leaves on lower edge, and than created a border of leaves for a layer on the top of page.
 
Page 3 - placed 4 shadow blackouts of the pumpkin files and layered the pumpkins and overlay on bottom edge of page.
 
Page 4 - layered a leaf border with a basket on corner.
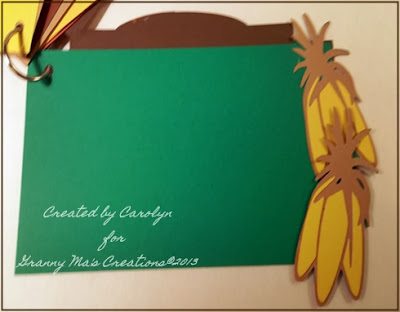
Page 5 - Indian Corn created on edge of mini-album.
 
This is the final mini-album.  I punched a hole in corner with a hand punch and used a big eyelet from a package I found in the sewing section of Wal-mart.  Each page will be decorated and photo mats placed for photos of grandchildren.

Please join us at Creative Cutting Challenges and enter your Thanksgiving themed creation for a prize.  Thank you for stopping by, and hugs to all xoxo.

Monday, October 21, 2013

Challenge # 20- - Halloween - Not a Card


***

Halloween - Not a Card.  I chose to create French Fry boxes, using the Haunted Tree file and Halloween Set Two for my non-Halloween Cards.  Using a French Fry box file from http://www.svgcuttingfiles.com I used the Ghost and Tombstone from the Halloween Set two and welded to the top of box.  The same with the Haunted House fry box.  I had a acrylic Halloween stamp that I stamped a spider web, and spiders on the bottom of the boxes.  The circular sentiments are print and cut, and I also cut out two extra spiders; and used the Bats from the same set of Halloween file, making them smaller.  The circular sentiments are placed on foam tape along with the bats and spiders.  A fun container to fill with Halloween Candy corn, in baggies, to hand out to little ones or use at a place setting for a Halloween party.

Thank you for stopping to visit with me, and hugs to all.


Carolyn

Monday, October 07, 2013

Jack O'Lantern-Shaped Cards


I created two Halloween Cards with the Jack O'Lantern Card from Creative Pointe.  First Jack O'Lantern Card I used design paper for the pumpkin, layered on black background.  The card base is brown cardstock by Stampin! Up.  I found the spider file in the library in Make the Cut library which I converted to a svg file and placed at the tip of the hat.  The spiders I stamped with a acrylic stamp I have on hand.  The second Jack O'Lantern card I used orange cardstock for the pumpkin, and the cardbase is from my Craft stash.  Both cards will be sent to my granddaughter's in Korea along with a small Halloween gift of candy.  Also the small skulls in corner of each card is a created svg file I done up.

Thank you for stopping by, and hugs to all.

***

Challenges entering:

Monday, September 23, 2013

Challenge #19 - For the Girls

Good morning, all.  For the challenge at Creative Cutting Challenges, the theme is For the Girls and my project is a gift card created out of this purse from Girlz - Set Two


Purse closed


Purse open


You will be able to lay a gift card inside the purse (I would add a glue dot or two to the gift card) and close the purse.  The clasp I cut out of cardstock and two pieces of poster board and used some magnetic pigment color paint - bronze- to create a clasp.  Couldn't locate the magnets I thought I had in my stash of embellishments, so I used Velcros squares which I punch a circle  and place in the correct area for keeping the purse closed.

I printed and cut the heels from the file and colored red - all girls like to shop for new shoes.  Placed with foam tape to the left side and stamped the sentiment opposite side.  Place a ribbon for embellishment. Bot sentiments I used a retired stamp set from Stampin Up.

Stop by Creative Cutting Challenges and have a look at the Design Team's creations, and join us in the challenge.  Thank you for stopping by and visiting with me today.

Monday, September 09, 2013

Creative Cutting Challenges - Anything Goes

For our first challenge this season (for 2013-2014) is Anything Goes and I chose


and created a 2-page layout of my great grandson attending his first car show with his G-pa.

 
 First Page.

****

 
 Second page

****

Supplies used:
  •  several brands of cardstock from different sources
  • the border along the bottom of both pages I trimmed with my paper cutter.
  • the shaped street, lines down the streets and stop sign are from the "Birthday Haul" by Creative Kuts Crop-on-Line Kit 
  • photo mats and titles I created in SCAL3
  • I placed photos of great grandson, Carson in the mats, and punched his face with a circle punch.
****
Thank you for stopping by to visit with me, and please stop on over to Creative Cutting Challenges to see what we have been doing, and to join in the fun.  Hugs to all.

Monday, May 13, 2013

Father's Day Challenge at Creative Cutting Challenges

Here's a card using the file ...Number 1 Dad.

I used Kraft type cardstock for the base of the card. I created a shaped card by laying the shadowed piece of the image on the edge of the card, and joined together creating a card base. The card is created from a plaid design I found on My Memories Suite scrapbook software, exported to my file, and than printed giving me the plaid look of a shirt. For the inside of the card, which is white on the inside, I cut a piece of kraft card stock to about 3 inches and glued to the inside...contrasting the colors. I wanted a tie created out of design paper and had a pad of these small to medium size paper. Decided on the black polka dot for the tie, and layered on to a shadow of the svg cut. Put it all together and presto...a Father's Day card for my son over-seas.


The svg file is available Cut and Create - Cindy Pointe.

Join us in the challenge at http://www.creativecuttingchallenges.blogspot.com and thank you for visiting with me today.  Hugs to all.

Monday, April 29, 2013

Wedding Card Challenge

Wedding Card Challenge....great fun creating this card as it is for my step-son and soon to be wife  who is getting married this coming May 4, 2013.

Using the cut file from Creative Pointe and a cut file from .silhouetteonlinestore.com by Lori Whitlock I used cream color card stock for the base.  The silvery, glittery paper on the cake from Michaels Store and the gray polka dot background paper for the layering.  The Silhouette Wedding Couple are one's I created using my SCAL3 software, and will be available in my store. Small flowers from the ribbon section of the sewing department of Wal-mart Store; and the pearls on each end of card in the $1.00 section at Michaels.

Wedding Card
 Thank you for stopping by and go on over to http://www.creativecuttingchallenges.blogspot.com and have a look at fellow Design Team members work, and participate for a chance to win a prize.  Hugs to all.


---------------------------------------------

Challenges entered: 


Monday, April 15, 2013

Mother's Day Challenge


Card #1:

I first cut out the card base from a svg file from http://www.creativepointe.com with Mom cut out in approximately the center.  Than using Versamark and a Stampin! Up stamp, Fifth Avenue Floral (believe it's retired stamp set) I placed the watermark image right below Mom and embossed with white embossing powder.  Use a ribbon and two flowers for embellishing the card.  For backing of the Mom cut out I placed a  off-white piece of cardstock and placed behind the opening.


 The next two (2) cards using the card base from BirdsCards names Rose Edge Card whiich is a stenciled edge of Roses.  The card can be used with the rose edge to the side or as I done, along the bottom. 

I cut out the Mom Charm and the back shadow and placed over a ribbon above the cutouts of the stenciled roses.  The blue card I placed small flowers at each ends of the charm and added punched butterflies for embellishments.

I hand trimmed the backing for the blue card, and than for the green card, I joined the pieces to come up with a 'welded' look and cut out with my machine.  And than trimmed it off at the perforated line.  Easy-peasy....

Head on over to Creatove Cutting Challenges and check out the DT's projects, and if you like, submit a card or layout of your own in the challenge.

Thank you for stopping by, and hugs to all.

Monday, March 18, 2013

Creative Cutting Challenge Anything Goes - Bowling 2-page layout

Page 1 of 2 page layout

Page 2 of a 2 page layout

Using A Bowling file from Creative Pointe, I created a 2-page layout of my granddaughter bowling and on page one you will see her bowing to the her loved ones because she made a spare.....
Bowling pins borders, Let's Roll! title and bowler in the left hand corner of page one, and right corner of page 2 from Creative Pointe designs.  The frame is my creation, combining bowling ball and pin to the frame and layered over a photo.
Going with the same borders on page 2, and the bowler in right corner from Creative Pointe, I also matted the photo of happy granddaughter.  The title is a purchased file from another svg company (can't remember as I purchase a lot of files here and there) and placed bowling balls at the end of each top border of bowling pins.


Check out the Design Teams beautiful work at http://www.creativingcuttingchallenges.blogspot.com and add your creations for a chance to win a prize.


Thank you for stopping by, and hugs to all.