Lovely orange butterfly visiting our small flower garden .
Tuesday, October 29, 2013
Monday, October 28, 2013
Die-cutting Monday at Scrapbook Blessings Club
Good morning Friends. Carolyn here for Scrapbook Blessing's Club
Monday's Die Cut project. Before I begin, I would like to apologize for
being late with this posting. Sometimes, life just gets in the way,
and I forget what I am to do.
Here is my die cut machine project .... my good ole trusty Silhouette Cameo machine. I do most of my die cutting with the Cameo, but occasionally I will bring out my Sizzix Big Shotz (my 2nd choice of die cutting machines).
Die cutting machine used: Silhouette Cameo
Cardstock from my personal stash - not sure if it's from Wal-mart or a local craft store.
Design paper from stash.
I
used SCAL3 software and created a shape card (yes, I know this is a
card but I am wanting to display the die cuts!!) of a giraffe. All
pieces were cut out using the Cameo. The sentiment is stamped but I
don't remember what stamp set it is. I punched the sentiment using my
circle punch and the also the scalloped punch was used.
Saturday, October 26, 2013
Jack O'Lantern Wooty
Good morning peeps! I am a date late in posting this DT project for SweetPea Stampers!
I decided to create a CAS type card, other than the sentiment being popped up by foam tape, the image was printed on white card stock that I cut and printed out on my Cameo. I colored the image using Smooch paint and Spectrum Noir markers. The gems from my stash.
Thank you for visiting with me today, and hugs to all xoxo.
****
Challenges entered:
- 365 Cards Halloween
- Alphabet Challenge S for Scary
- Crafts 4 eternity Recipe #147 Happy Halloween
- Delicious Doodles Challenges Halloween Something Scary
- Docerela Creations Anything Goes
- Left of Center Creative Challenge Halloween or Creepy
- Stampin' for the Weekend Something Spooky
Friday, October 25, 2013
3 Ghosts visiting Stamping Dragon Designs
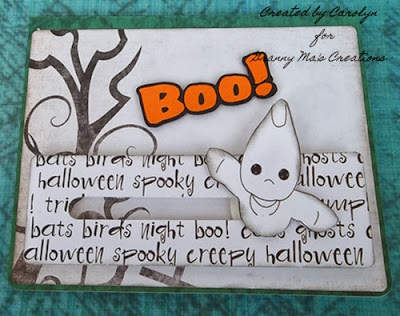
I created this card from a tutorial by Lori Whitlock of Silhouette America Online Store. The card base is her design. I substituted the penny for circles created out of poster board. The designer paper from a stash of paper I purchased at a scrapbook store that has closed. The first layer from the Silhouette Online Store paper collection. I used Grey Stampin Up ink to smudge up the edges of the ghost.
This second card I used the same paper design from the Silhouette Online Store along with a cut file that I purchase of a haunted house, creating a Halloween scene. The moon is a circle I cut out of yellow cardstock. The ghost on right hand side of card is placed on a wobbly spring like thing. The word 'boo' I created using my Silhouette Studio DE. Again the ghosts are smudged with Gray ink from Stampin Up ink pads.
Thank you for stopping by, and hugs to all.
♥ Carolyn
Friday Scrapbook Layouts - Past and Present
Hey you all, it's Carolyn for the Scrapbook Blessings Club, and I am
here to show you scrapbook layouts that I have created, past and present
projects.
Hope you have a blessed day and thanks for stopping by,
Carolyn-----
I will have to admit that most of my layouts are from Creative Kuts that
she offers on her Facebook Group page for a nominal fee, and for me, I
look at the kits and decide if I can work a layout project for one of my
grandchildren's scrapbook. I believe this was a kit that came out in
the Summer of 2012 and it's a one page layout. I layered all onto blue
cardstock which represents the sky. The green design paper with grass
is the grassy area of a beach . Two photo mats placed to the left and
the title "Too Flippin' Cute" placed on top of the first photo mat. A
pair of flip flops and a scalloped doilie to place another photo into.
This was for a project last November - where I used a snowman, snow shovel and snowflakes from Cindy Pointe of the Cut and Create Store.
I created a snow scene with a circle and tried to create a snowy hill
where the snowman sat and a shovel sitting for use to clear the snow
away. The snowflakes I sprayed with some shimmer mist and all placed on
cardstock which I cut out with the title along the top and side edge.
I
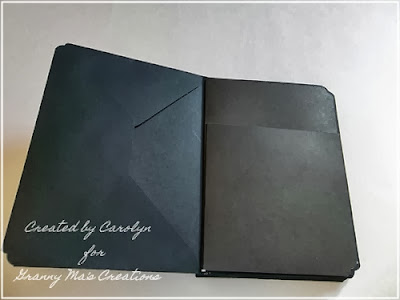
am presently working on two Envelope-mini albums for my granddaughters
and this is the beginning of the 2nd mini-album. I am using black
envelopes with black cardstock for the library card insert which will
add more room for photos, etc. The first Envelope Mini-album is further
along as it is for my 13 year granddaughter which begins with her birth
to age 13. The one shown is for her sister and will be from birth to
age 13. Instructions for this was found on Youtube . This is a free tutorial by Kathy Orta of Paper Phenomenon and she is very thorough in the tutorial.
I
do have other mini-albums as work in progress too and working on a
birthday album for great grandson's 3rd birthday. Check out my progress
at my blog as I will post as I go along.
Tip:
save all the left-over design paper and card stock as you can use in
your layout projects; and another one: when to a craft store have in
mind what you would like to use for your layout projects for paper,
embellishments, and decorations. Next time I am to Michaels, I will be
searching the paper there for designs I would like to use in my Envelope
Mini-albums (i.e. Hello Kitty!) Also, another paper you can use for
your layouts is gift wrap paper, so I will look for Hello Kitty gift
wrap paper for my youngest granddaughter's mini-album.
Carolyn-----
Monday, October 21, 2013
A new Release at Scrapper's Delight
This cute little girl is Fairy Day Dream and comes with and without wings...
I chose to work with the Fairy without wings, coloring with my Spectrum Noir ink markers. First printed her on white cardstock and than hand ripped around the image, and than sponged some distressed ink, Tea Dye around the edges. Also sponged in blue for the sky background.
The cardstock is the bright colors from Stampin Up that I had ordered awhile back, and I have decided, after laying the two colors together, that I like them. Bright and cheery, and than I placed a strip of black and white polka dot washi tape at the bottom, after punching the corners with my corner scalloped crop-dile. Then I created a border on the bright yellow piece of cardstock and layered this on the.
I traced the images in Silhouette Studio Design Edition, and than placed the wingless Fairy on the Mushroom, making her like she is sitting there thinking. Two flower brads on the one end, and two gems on the one side.
Would make a nice general greeting card to send to a friend or family member who needs cheering up. This image(s) along with pumpkins are available at Scrapper's Delights.
Thank you for stopping by to visit with me today, and blessings to you all.
***
Challenges entering:
- Creative Craft Challenges2 Anything Goes blogsavery
- Cuttin and Stampin Color Challenge Orange, Purple, Green & Black
- ike's world challenges Anything Goes
- Through the Craft Room Anything Goes
- One Stitch At A Time Anything Goes
Challenge # 20- - Halloween - Not a Card
***
Thank you for stopping to visit with me, and hugs to all.
♥ Carolyn
Sunday, October 20, 2013
Challenge # 4 - Twisted Easel Card
This next challenge is Twisted Easel Card and they're not hard to create. You can find the tutorial here at Scrapbook Blessings Club on how to create this card; and there are several videos at Youtube.com just by performing a search for Twisted Easel Cards.
This two week challenge is sponsored by Bugaboo Digi Stamps and we thank them for their generosity. I chose Frame it - JJ - call me a witch to create this twisted easel card. I used several different type of coloring methods to color in this image, one being Grey fingernail polish on the frame with another layer of clear nail polish that has black sparkles included.
Measurements for the card:
CS - 4 1/4 x 9 3/4
Main piece (I used) is 4 1/2 x 5 1/2. I created this on Studio Design Edition virtual mat and placed the image into created rectangle, and printed and cut out.
You score the 4 1/4 x 9 3/4 CS at 5" and than the 4 1/4 end, you score from left to right diagonally and than fold and this is where you attached the 4 1/2 x 5 1/2 piece.
Now, if you wish, you can mat this with
- 4 x 5 1/4 mat
- 3 3/4 x 5 mat and use this to place your image on. I could've done it this way but wanted the fuller look of the image.
Join us in this challenge at Scrapbook Blessings Club for some fun (read rules carefully please) and thank you for stopping by to see what we're all doing. Hugs to all xoxo.
***
Challenges entering:
- A Gem of a Challenge 102 Spooky
- CMC Copic Challenge Group # 79 Anything Goes
- Crafty Calender Challenge Halloween
- Penny Black Saturday Challenge Spooky
- Dream Valley Challenges Halloween
- Eclectic Ellapu Halloween
- Glitter n Sparkle Challenge Halloween
- Pile it On Halloween/Day of the Dead/Cute and Creepy
Friday, October 18, 2013
Orange and Black Challenge
Who loves a scarey pumpkin and scarecrow?
For this Orange and Black Challenge I selected Pattie's image Spooky Scarecrow printed out on a 4.5x4.5 white cardstock. I layered the piece onto a black cardstock and than onto orange card base. For my coloring median I use Smooch Pearlized Accent Ink for the pumpkins, black gel pen for the blackbird, and two black brads for the buttons on the old shirt/jacket. The jacket was colored with ink marker from Close to My Heart; the fence and yellow background in pumpkin I believe I used my Spectrum Noir markers. And the grass was colored with green from Spectrum Noir markers, too. Baker's Twine wrapped three times around the center of card, and two brads in the corners for accents.
Stop on over at Pattie's Creations Digital Images, a Etsy store for a look see at her creations that is available for purchasing; and head on over to Pattie's Creations Design Challenge Blog to join in with us in the challenge.
Thank you for stopping by to visit with me, and hugs to all.
***
- Bloggers Boo to you
- Card Crafter's Circle Challenge #97 In the Pumpkin Patch
- Card Makin Mamas Trick or Treat!
- Craftitude Challenge #51 Anything Goes or Spooky
- Digi Haven Halloween
- Kitty Bee Designs Challenge #10 Halloween
- Left of Center Creative Challenges #16 LOC/Halloween/Orange/Black
- Simply Create Too Challenge #48 Halloween [Or use Orange]
- Sister Act Card Challenge Anything Goes
- Totally Paper Crafts Too Cute to Spook
♥ Carolyn
Tuesday, October 15, 2013
A finished BAP - Spider Web Overlay
Spider-Cat Overlay by Creative Kuts
I cut the overlay out with my Silhouette Cameo in black and layered onto orange mat. Stamped happy halloween, using my Stampin! Up set of Teeny Tiny Wishes stamps for the sentiment. The spider piece I covered with Stampin! Up Stickles and let dry, and than placed on a foam dot onto the spider in the overlay.
Thank you for stopping by, and have a blessed day.
♥ Carolyn
Monday, October 14, 2013
Matchbook Birthday Card
Hey everyone, Carolyn here with a die-cut card I created for my
granddaughter's 13th birthday, showing closed and opened views:
Stop on over to Scrapbook Blessings Club and check us out.
Hope you have a blessed day and thanks for stopping by,
and
My recipe for this
Matchbook Card from the Silhouette Online Store
Cardstock used: Stampin! Up and Colorbox 12x12 paper pad
Stamp sets used: Stampin! Up Birthday Wish
Stampin! Up Girlfriend Accessories
Image is from The Craft Studio
I brought up the image in The Craft Studio and sized it to 4.25 x 4.25 and than printed. Plus the sentiment was sized to fit.
I
than went to my Silhouette Studio Design Edition and brought up the
Matchbook Card file and resized to 4.25 x 8.50 and cut it out. This
file included the scalloped square which I also resized. Very easy to
cut out and put together. The pocket I cut out, and folded the sides as
valley and mountain folds, and used 1/4" scor-tape to tape it into a
pocket. Added adhesive to back of pocket and placed in the inside of
matchbook card.
The
top inside I cut out a 4.25 x 4.25 (approx) and stamped the sentiment
and two images on each corner, and than used my Spectrum Noir ink
markers to color in.
The
sentiment, "Have a Fabulous Day" I printed and cut with the Cameo and
placed foam tape on the back and placed where the cover would slip into.
And I placed a Clarinet charm and chain in the pocket for a gift for my granddaughter who participates in band.
Die cutting machine used: Silhouette Cameo and software.
Die cuts used: scalloped square and a rectangle piece for the backing on the sentiment.
Tip for today: don't wait until the end of the day to take photos of your handiwork.
Hope you have a blessed day and thanks for stopping by,
♥ Carolyn
Saturday, October 12, 2013
Winner's Announcement
Copied from Scrapbook Blessings Club Blog:
Last Saturday, we had our official Scrapbook Blessings Club/ Meet the DT Blog Hop and Party! We had a blast. The new design team out did themselves on their posts plus were so generous with the blog candy/prizes.
In addition to the blog hop, we had a fabulous time at the SBC Facebook group. We made new friends, met up with old scrappy ones and had a ton of laughs. Throughout the day, we had games and quick challenges, so that makes for a LOT of winners! Well, we're all winners but these ones actually get some great prizes, lol.
Now, just because the launch and hop are over, doesn't mean that the party is! We would love for you to follow SBC for up to date tips, techniques and tutorials Monday thru Friday. Also, we a video tutorial every 1st and 3rd Sunday of the month. We would love to see how the video inspired you and to give you a chance to win awesome sponsored prizes. Our 2013 sponsor calendar is full! And only a few more spots open for 2014 left. IF you are interested in sponsoring SBC, please email Sandy at Cleosan52@yahoo.com and mark sponsorship in the subject.
Also, if you are on FaceBook, we have the SBC Facebook Group. This is a fun group with plenty of tips, games and inspiration. We would love if you became part of the club!!!
Finally, if you are a tweeter, you can follow us on Twitter@ https://twitter.com/SBBlessingsClub
Hope you have a blessed day and thanks for stopping by,
Last Saturday, we had our official Scrapbook Blessings Club/ Meet the DT Blog Hop and Party! We had a blast. The new design team out did themselves on their posts plus were so generous with the blog candy/prizes.
In addition to the blog hop, we had a fabulous time at the SBC Facebook group. We made new friends, met up with old scrappy ones and had a ton of laughs. Throughout the day, we had games and quick challenges, so that makes for a LOT of winners! Well, we're all winners but these ones actually get some great prizes, lol.
Drum roll please..... Our first blog hop and Launch Party winners are....
BLOG HOP WINNERS:
SBC- Pinque Peacock Hop Sponsor- Anita Braddock @ http:// anita-craft-corner.blogspot.com /
SANDY- Sher Brown @http:// patternsbysher.blogspot.com/
CAROLYN- UT Hobby Time @http:// utshobbytime.blogspot.com/
LUISA- Vicky Fortier @ http:// crafting-vicky.blogspot.com/
MARILYN- Gloria Zuniga @http:// gloriasgoofycraftspot.blogspot. com/
CINDY- Helen Helton @ http:// nanaluvs2scrap.blogspot.com
JENNYFER- UT Hobby Time @http:// utshobbytime.blogspot.com
CRISTINA- Anita Braddock @ http:// anita-craft-corner.blogspot.com /
LYNNE- Helen Helton @ http:// nanaluvs2scrap.blogspot.com
TERESA-Laura Davidson @http:// lauraleesdream.blogspot.com/
FACEBOOK GROUP GAME WINNERS:
- Tic tac toe- Marilyn Leonard
- Bingo- Karen Spurgeon
- DT Scavenger hunt- Laura Davidson
- National Card Day quick card- Helen Helton
- Photo Detective- Marilyn Leonard
- Ugly Paper Contest- Jennifer Lepard
- Photo Scavenger- Helen Helton
- What Am I Winners:
Red Bling- Cristina Ojeda
Stickers- Marilyn Leonard
Purple Bling- Laura Davidson
Wooden stamp- Melissa Lutz
Buttons- Stephanie Wright
Flowers- Cristina Ojeda
Now, just because the launch and hop are over, doesn't mean that the party is! We would love for you to follow SBC for up to date tips, techniques and tutorials Monday thru Friday. Also, we a video tutorial every 1st and 3rd Sunday of the month. We would love to see how the video inspired you and to give you a chance to win awesome sponsored prizes. Our 2013 sponsor calendar is full! And only a few more spots open for 2014 left. IF you are interested in sponsoring SBC, please email Sandy at Cleosan52@yahoo.com and mark sponsorship in the subject.
Also, if you are on FaceBook, we have the SBC Facebook Group. This is a fun group with plenty of tips, games and inspiration. We would love if you became part of the club!!!
Finally, if you are a tweeter, you can follow us on Twitter@ https://twitter.com/SBBlessingsClub
Hope you have a blessed day and thanks for stopping by,
♥ Carolyn
Friday, October 11, 2013
Circles Challenge
Next challenge at Stamping with Dragon is Circles and I used this for my one-page layout for my great-granddaughter's scrapbook.
Yes, I know that she is a girl, and this blue paper, but the paper pad is brand new, and pink was not included in the pad...lol. I created the layout in my Silhouette Studio DE software, layering the photo into the frame. I sized to about 6x6 and print and cut the image. Than I cut out a 7x7 scalloped circle for layering. And since her Mom's theme for Isabella is Ladybugs, I cut out a ladybug for embellishing the layout along with her name. Placed flowers opposite on the frame. Isabella, from what her Mommie has told me, is about 5 1/2 months old in the photo; and I am creating a mini-album beginning with her birth to her 1st birthday, each page reflecting her age for that month.
Thank you stopping by, and head on over to Dragons Lair Design Shop and have a look at what is available. Hugs to all.
♥ Carolyn
Thursday, October 10, 2013
Product review of We R Memory Keepers - Card Punch - 3 x 4
We R Memory Keepers - Card Punch 3 x 4
The We R Memory Keepers 3 x 4 Card Punch is one of our most
popular products at Scrapbook.com. Using this handy tool from We R will
let you turn any scrapbook paper or a photo into a 3" x 4" card with
beautifully rounded corners. This size works perfectly with the Project
Life method. We R is known for making some of the best and most
innovative scrapbooking and paper crafting products in the world and
this product fits the bill. The features of the Card Punch tool include:
***
I receive newsletters from Scrapbook.com and this was on their weekly listing. I checked it out and liked what I saw and decided to order and use for my scrapbooking, punching the photos down to the size I want for the scrapbook albums and mini-albums I am creating. Also a good way to create journaling tags for the pages.
And now for the tutorial....
This is the 3x4 Card punch shown with the top blue part down and locked for storage purposes. You push the blue button on front of punch to the right and the top pops up. When putting in the locked position, you push the blue part down.
The punch is now ready to start using.
Here I have placed a piece of card stock on the punch, representing a photo.
The next step shown is where you position the cardstock or photo under the plastic glass. When satisfied with the position to be punched, you use both hands, and press down firmly on corners of the punch to punch it to a 3x4 photo or journaling tag, etc.
The above two pictures will give you an idea of what is punched out with this punch.
Nice punch to use for the photos you would like to fit on a scrapbook page or mini-album. And I punched out two lined sheets of design paper to use as journaling tags for my granddaughter's mini-album.
I have found that you have to push straight down and firmly with photo paper or the results will be a messed up photo. As with the two recipe pictures, I've done some hand trimming and a corner rounder to clean up the mess.
I purchased my We R Memory Keepers - Card Punch 3x4 from Scrapbook.com but Internet search shows it's available at Home Shopping Network. Check out We R Memory Keepers for tutorials, videos and product reviews.
***
My tip: work on a cleaned off area so you can punch the item with ease. If the punch is not on a flat area, it may not work too well.
***
Thank you for stopping by, and hugs to all .
♥ Carolyn
Triple Time Stamp Technique - Hello
This is the 2nd Tripe Time Stamp Technique card I created for Scrapbook Blessings Club where I used a floral arcylic stamp for each corners, and stamped Hello in the center of the first layered piece. Added butterflies and small silver brads to each corner. Layered the piece on black card stock using foam tape.
Here is the inside of the card:
I kept with the theme of the front by stamping the butterfly image in the corner, leaving the center for writing (cards will be donated to Operation Home Write).
Thank you for stopping by, and hugs to all.
***
Challenges entering:
- 7 Kids College Fund Challenge Anything Goes
- Addicted to Stamps and More Challenge #66 Anything Goes
- Lady Anne's Challenges #12 Stamp Anything Goes
- The Sisterhood of Crafters Anything Goes
Monday, October 07, 2013
Jack O'Lantern-Shaped Cards
I created two Halloween Cards with the Jack O'Lantern Card from Creative Pointe. First Jack O'Lantern Card I used design paper for the pumpkin, layered on black background. The card base is brown cardstock by Stampin! Up. I found the spider file in the library in Make the Cut library which I converted to a svg file and placed at the tip of the hat. The spiders I stamped with a acrylic stamp I have on hand. The second Jack O'Lantern card I used orange cardstock for the pumpkin, and the cardbase is from my Craft stash. Both cards will be sent to my granddaughter's in Korea along with a small Halloween gift of candy. Also the small skulls in corner of each card is a created svg file I done up.
Thank you for stopping by, and hugs to all.
***
- By LORi Designs Challenge Black, Orange & Your Choice
- The House that Stamps Built Halloween
- Paper Pretties This is Halloween
- Penny's Paper-Crafty Challenge Anything but Square
- DRS Designs Rubber Stamp Challenge #91 Inspired by Autumn
Sunday, October 06, 2013
Mini-album for Granddaughter
Besides my Design Team duties, I am creating a special birthday album for my soon-to-be 13 year granddaughter. I found the video on youtube.com for this Envelope Mini Album Series by Kathy Orta of Paper Phenomenon and thought this would make a great gift for my granddaughter, with photos from when she was born to age 13. (From 13 to 18 will come later in another mini-album.)
I looked all over for the 5.25 x 7.25 envelopes (she used black in her video) and finally located these online at Hobby Lobby. And in the video she uses 6 envelopes to create 3 pages, but I doubled that so mine is going to be a thick book! I've been busy decorating the pages. The second page of this display shows a library card page, which you find the instructions in the video. (Sorry, no written .pdf instructions - shucks. So I end up viewing the videos when I am ready for the next step!)
I have 2 more page sets to decorate, and than will attach as a book. And create the photo mats that will go inside the envelopes.
I will post as I get another section finished, but go on over to youtube.com and type in Envelope Mini album in the search line, and view the videos for instructions on how to create this mini-album. Thank you for stopping by, and hugs to all.
Triple Time Stamp Technique - Challenge #1
Our challenge at Scrapbook Blessings Club is Triple Time Stamp Technique, and I tell you, I love this technique and will make more. I'm thinking of Christmas cards for the few I send; and they are so easy to create.
I love butterflies, they're my favorite. One video I watched indicated you can color in your images before layering so I colored in the butterflies.
Here is the inside of my card where I stamped a butterfly in the lower right hand corner, to keep with the theme of the stamping.
Head on over to Scrapbook Blessings Club for the tutorial challenge, and play along with us in our first challenge.
Thank you for stopping by, and hugs to all.
Saturday, October 05, 2013
Spam is unacceptable
Spam is unacceptable on my/in blog comments. If you have something to 'sell', do it elsewhere.
Scrapbook Blessings Club First Blog Hop
Welcome to our first Scrapbook Blessings Blog Hop. Today, we are celebrating an exciting new journey at the Scrapbook Blessing Club! So let the party begin!!!
We are so super thrilled to introduce our new SBC Design Team. At SBC, "we are making crafts and saving memories one technique at a time." We have daily themed posts to bring you lots of fun and creative tips, techniques, and tutorials to use for all your paper crafting projects.
Also, we have a sponsored video tutorial challenge every 1st and 3rd Sunday of the month, for us to learn fun ideas and for a chance to win great prizes. And we also have our own Facebook group, Scrapbook Blessing Club found HERE. Our team will be bringing you great tips, sites to look at and online deals each and every day.
So please take a few minutes and hop along with us, checking out all the talent these ladies are contributing to our Club. You should have hopped over from Lynne but if you are just joining us you can start at the beginning over at Scrapbook Blessings Club.
For my presentation for the Opening Blog Hop I created a scalloped-circle easel card. I created the easel card using Silhouette Studio Design Edition. I created two scalloped circles, welded together, and than folded the top circle in half, and placed adhesive on the front half, and placed the scalloped circle on the folded section. Before I cut out the individual scalloped circle, I merged/open the digi image onto the mat, traced and than placed where I wanted the image to sit. Once I was satisfied with the settings, I print and cut the piece and have the scalloped circle ready to place on the easel section. I colored the image with my Spectrum Noir ink markers using shades of gray for her dress. Sponged the edges with Distressed Ink - Black.
To be elligible to win this prize:
**** Next SBC video tutorial challenge is tomorrow****
Blog List-
1. SBC- http//:www.scrapbookblessings.blogspot.com
2. Marilyn - http://marilyncricutcards.blogspot.com/
3. Cindy - http://www.inlovewithpaper.blogspot.com/
4. Teresa- http://freshandrenewed.blogspot.com/
5. Lynne ~ http://slasewcraftiness.blogspot.com/
6. Carolyn - http://www.grandmacarol46580.blogspot.com/
7. Cristina - http://www.vintagepink39.blogspot.com
8. Sandy- http://www.aworkingmomsjoy.blogspot.com
9. Jennyfer - http://www.scrapalajen.blogspot.com
We are so super thrilled to introduce our new SBC Design Team. At SBC, "we are making crafts and saving memories one technique at a time." We have daily themed posts to bring you lots of fun and creative tips, techniques, and tutorials to use for all your paper crafting projects.
Also, we have a sponsored video tutorial challenge every 1st and 3rd Sunday of the month, for us to learn fun ideas and for a chance to win great prizes. And we also have our own Facebook group, Scrapbook Blessing Club found HERE. Our team will be bringing you great tips, sites to look at and online deals each and every day.
So please take a few minutes and hop along with us, checking out all the talent these ladies are contributing to our Club. You should have hopped over from Lynne but if you are just joining us you can start at the beginning over at Scrapbook Blessings Club.
For my presentation for the Opening Blog Hop I created a scalloped-circle easel card. I created the easel card using Silhouette Studio Design Edition. I created two scalloped circles, welded together, and than folded the top circle in half, and placed adhesive on the front half, and placed the scalloped circle on the folded section. Before I cut out the individual scalloped circle, I merged/open the digi image onto the mat, traced and than placed where I wanted the image to sit. Once I was satisfied with the settings, I print and cut the piece and have the scalloped circle ready to place on the easel section. I colored the image with my Spectrum Noir ink markers using shades of gray for her dress. Sponged the edges with Distressed Ink - Black.
In this photo, I have the easel card open and laying flat out, showing the second part. Once again I merged the circular image to the size I needed to fit in the base. I placed to black brads in the 'o's' and a ribbon was placed under the center sentiment. I created the bow with my Easy Bow and watching a a how-to video Using the Bow Easy on Youtube.
I initially watched this video on how to create a circle easel card: Scallop Easel Card
on Youtube.com and featured on Scrapbook Blessings Club.
***
To be elligible to win this prize:
- Follow Scrapbook Blessings Club
- Follow my blog (insert name)
- Leave a comment on this post
**** Next SBC video tutorial challenge is tomorrow****
Blog List-
1. SBC- http//:www.scrapbookblessings.blogspot.com
2. Marilyn - http://marilyncricutcards.blogspot.com/
3. Cindy - http://www.inlovewithpaper.blogspot.com/
4. Teresa- http://freshandrenewed.blogspot.com/
5. Lynne ~ http://slasewcraftiness.blogspot.com/
6. Carolyn - http://www.grandmacarol46580.blogspot.com/
7. Cristina - http://www.vintagepink39.blogspot.com
8. Sandy- http://www.aworkingmomsjoy.blogspot.com
9. Jennyfer - http://www.scrapalajen.blogspot.com
Friday, October 04, 2013
Penquin with a Ribbon used
Normally I have something written with this project but slipped up here!. I used the image Penquin by Pattie's Creations Designs in the center of the punched out opening. I first embossed the piece of 4.25x5.50 cardstock and than spritz with some shimmer to create a icy look.
The coloring median was a combination of copic markers, fingernail polish in the scarf and cap, and the white of the belly of the penquin was Picket Fence acrylic paint. Ribbon is from my stash collection of ribbons, and snowflakes a cut file in my Studio Library.
Head on over to Pattie's Creations Challenge for more inspiration from the Design Team members, and join us in this Ribbon Challenge.
Thank you for stopping by, and hugs to all.
***
- Crafty Catz Anything Goes
- Creative Fingers Challenge #5 Anything Goes Optional Twist Ribbon or Lace
- Sister Act Card Challenge #27 Anything Goes
Subscribe to:
Posts (Atom)