Tuesday, October 29, 2013

Monday, October 28, 2013

Die-cutting Monday at Scrapbook Blessings Club

Good morning Friends. Carolyn here for Scrapbook Blessing's Club Monday's Die Cut project.  Before I begin, I would like to apologize for being late with this posting.  Sometimes, life just gets in the way, and I forget what I am to do. 

Here is my die cut machine project .... my good ole trusty Silhouette Cameo machine.  I do most of my die cutting with the Cameo, but occasionally I will bring out my Sizzix Big Shotz (my 2nd choice of die cutting machines).


Die cutting machine used:  Silhouette Cameo
Cardstock from my personal stash - not sure if it's from Wal-mart or a local craft store.
Design paper from stash.

I used SCAL3 software and created a shape card (yes, I know this is a card but I am wanting to display the die cuts!!) of a giraffe.  All pieces were cut out using the Cameo.  The sentiment is stamped but I don't remember what stamp set it is.  I punched the sentiment using my circle punch and the also the scalloped punch was used.

Saturday, October 26, 2013

Jack O'Lantern Wooty


Good morning peeps!  I am a date late in posting this DT project for SweetPea Stampers! 

I decided to create a CAS type card, other than the sentiment being popped up by foam tape, the image was printed on white card stock that I cut and printed out on my Cameo.  I colored the image using Smooch paint and Spectrum Noir markers.  The gems from my stash.

Thank you for visiting with me today, and hugs to all xoxo.

****

Challenges entered:

Friday, October 25, 2013

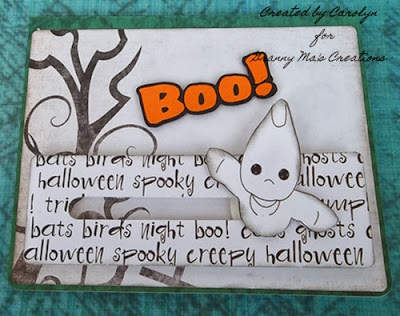
3 Ghosts visiting Stamping Dragon Designs


I created this card from a tutorial by Lori Whitlock of Silhouette America Online Store.  The card base is her design.  I substituted the penny for circles created out of poster board.  The designer paper from a stash of paper I purchased at a scrapbook store that has closed.  The first layer from the Silhouette Online Store paper collection.  I used Grey Stampin Up ink to smudge up the edges of the ghost.


This second card I used the same paper design from the Silhouette Online Store along with a cut file that I purchase of a haunted house, creating a Halloween scene.  The moon is a circle I cut out of yellow cardstock.  The ghost on right hand side of card is placed on a wobbly spring like thing.  The word 'boo' I created using my Silhouette Studio DE.    Again the ghosts are smudged with Gray ink from Stampin Up ink pads.

Thank you for stopping by, and hugs to all.

 
♥ Carolyn

Friday Scrapbook Layouts - Past and Present

Hey you all, it's Carolyn for the Scrapbook Blessings Club, and I am here to show you scrapbook layouts that I have created, past and present projects.


I will have to admit that most of my layouts are from Creative Kuts  that she offers on her Facebook Group page for a nominal fee, and for me, I look at the kits and decide if I can work a layout project for one of my grandchildren's scrapbook.  I believe this was a kit that came out in the Summer of 2012 and it's a one page layout.  I layered all onto blue cardstock which represents the sky.  The green design paper with grass is the grassy area of a beach .  Two photo mats placed to the left and the title "Too Flippin' Cute" placed on top of the first photo mat.  A pair of flip flops and a scalloped doilie to place another photo into.  


This was for a project last November - where I used a snowman, snow shovel and snowflakes from Cindy Pointe of the Cut and Create Store.   I created a snow scene with a circle and tried to create a snowy hill where the snowman sat and a shovel sitting for use to clear the snow away.  The snowflakes I sprayed with some shimmer mist and all placed on cardstock which I cut out with the title along the top and side edge.  


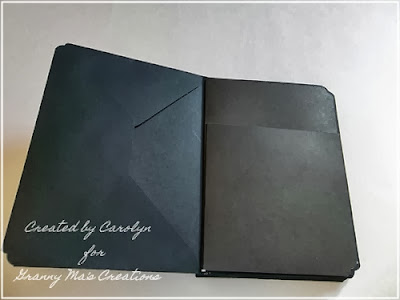
I am presently working on two Envelope-mini albums for my granddaughters and this is the beginning of the 2nd mini-album.  I am using black envelopes with black cardstock for the library card insert which will add more room for photos, etc.  The first Envelope Mini-album is further along as it is for my 13 year granddaughter which begins with her birth to age 13.  The one shown is for her sister and will be from birth to age 13.  Instructions for this was found on Youtube .  This is a free tutorial by Kathy Orta of Paper Phenomenon and she is very thorough in the tutorial.

I do have other mini-albums as work in progress too and working on a birthday album for great grandson's 3rd birthday.  Check out my progress at my blog as I will post as I go along.  

Tip:  save all the left-over design paper and card stock as you can use in your layout projects; and another one:  when to a craft store have in mind what you would like to use for your layout projects for paper, embellishments, and decorations.  Next time I am to Michaels, I will be searching the paper there for designs I would like to use in my Envelope Mini-albums (i.e. Hello Kitty!)  Also, another paper you can use for your layouts is gift wrap paper, so I will look for Hello Kitty gift wrap paper for my youngest granddaughter's mini-album.

 
Hope you have a blessed day and thanks for stopping by,

Carolyn-----